
- Messages
- 12
- Likes
- 6
- Location
- Ontario
- State
- CA
- Country
- United States
- What I Drive
- 2018 Kia Stinger G2
Hey offroading guys! (a little height joke...![[lovekia]](/images/smilies/icon_smile_ilovekia.gif "Love KIA [lovekia]") )
)
Here is a DIY installation guide of our GT-F lowering springs. Please note the color of the springs in the photos is a test color. GT-F springs are orange.
Tools needed:
10mm socket
13mm socket
17mm socket
19mm socket
17mm crescent wrench
----------------
To prepare for the spring installment have your car on the lift or jack stands with all 4 wheels off the ground and have the hood open. If you cannot have all four wheels off the ground at the same time we recommend at least two wheels off the ground. Front as a pair and/or rear as a pair. Remove your wheels and set aside.
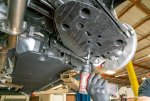
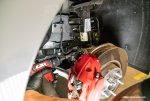
Starting in the rear, we must first disconnect the headlight sensor on the driver side by popping the clip out to release the sensor. A 10mm socket is then used to unbolt and remove the cover underneath the lower control arm.


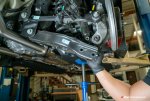
Use the 17mm socket to remove the linkage bolt connecting lower control arm to the strut. Then unclip the suspension sensor on the strut.
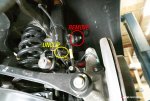
Next remove the ABS sensor with a 10mm socket.
Switch to a 13mm socket to remove the bracket for the suspension sensors and position it off to the side.
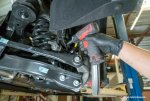
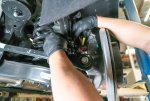
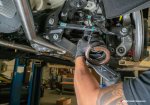
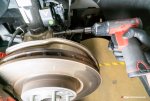
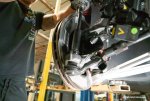
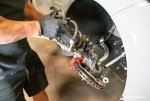
Brace the rear lower control arm from underneath for your safety. Then, using a 19mm wrench and impact gun, remove the 2 bolts on the lower control arm connecting the LCA to the strut and the knuckle.
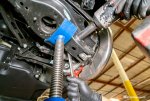
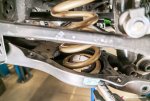
Pull down rear lower control arm and remove spring.
To reassemble follow the steps in reverse making sure that the spring is seated flush in the groove on the lower control arm with the rubber mount replaced on top. Be sure to brace the lower control arm before tightening the strut tower and rear knuckle.

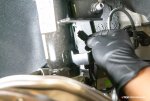
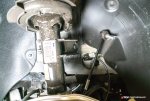
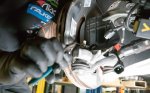
Moving to the front of the car. A 10mm socket is used to remove the brake line bracket on the engine side of the strut. A 10mm socket is going to be used to remove the bracket behind the caliper towards the front of the car.
Then switch to a 13mm socket to remove the bolt for the bracket above. This allows you to move the wiring out of the way in order to unclip the sensor behind the strut.
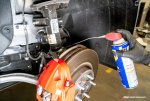
Use a 17mm socket to remove lower strut bolts. We sprayed WD-40 around the strut bolts so that they would slide out easier. The lubricant is optional.
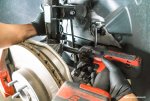
The nut towards the top of the strut is a tricky one. Grab your 17mm crescent wrench to hold the nut in place while you use a socket wrench with an Allen key to loosen the inner bolt. The link should slide out.
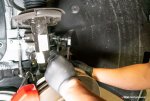
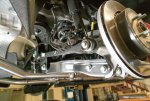
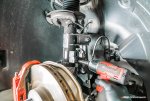
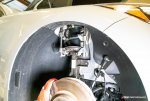
Unbolt the outer tier rod. First remove the holding pin. A 19mm is the used to remove bolt on steering knuckle. Grab the rotor at 3 and 9 o'clock and mimic left and right turns to loosen the outer tie rod bolt and then pull out.
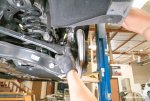
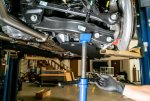
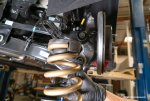
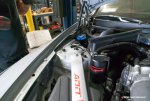
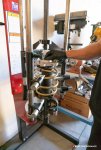
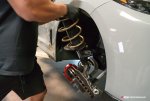
We found it safer, easier, and faster to leave the top hat on the vehicle as we remove the strut and spring assembly. Place spring compressors snuggly on the spring as you prepare for the next step. From the engine bay. unbolt the top nut from the strut by using a 19mm socket then tilt the strut and springs assembly towards you. Be mindful of the fender while you pull it out. Remove the top hat from the vehicle by using a 14mm socket to remove the three nuts that hold it in place.
We used a compressor to compress the spring before reinstalling the top hat. If you do not have a compressor, manual spring compressors must be used. Since we did not remove the brakes from the lower control arm one must carefully clear the fender upon reinstallation so as to not scratch the vehicle itself when replacing the strut with the newly installed spring.
And that's it! Please consult with your Kia Stinger expert on torque specs on all stock nuts and bolts.
Here is a DIY installation guide of our GT-F lowering springs. Please note the color of the springs in the photos is a test color. GT-F springs are orange.
Tools needed:
10mm socket
13mm socket
17mm socket
19mm socket
17mm crescent wrench
----------------
To prepare for the spring installment have your car on the lift or jack stands with all 4 wheels off the ground and have the hood open. If you cannot have all four wheels off the ground at the same time we recommend at least two wheels off the ground. Front as a pair and/or rear as a pair. Remove your wheels and set aside.
Starting in the rear, we must first disconnect the headlight sensor on the driver side by popping the clip out to release the sensor. A 10mm socket is then used to unbolt and remove the cover underneath the lower control arm.
Use the 17mm socket to remove the linkage bolt connecting lower control arm to the strut. Then unclip the suspension sensor on the strut.
Next remove the ABS sensor with a 10mm socket.
Switch to a 13mm socket to remove the bracket for the suspension sensors and position it off to the side.
Brace the rear lower control arm from underneath for your safety. Then, using a 19mm wrench and impact gun, remove the 2 bolts on the lower control arm connecting the LCA to the strut and the knuckle.
Pull down rear lower control arm and remove spring.
To reassemble follow the steps in reverse making sure that the spring is seated flush in the groove on the lower control arm with the rubber mount replaced on top. Be sure to brace the lower control arm before tightening the strut tower and rear knuckle.
Moving to the front of the car. A 10mm socket is used to remove the brake line bracket on the engine side of the strut. A 10mm socket is going to be used to remove the bracket behind the caliper towards the front of the car.
Then switch to a 13mm socket to remove the bolt for the bracket above. This allows you to move the wiring out of the way in order to unclip the sensor behind the strut.
Use a 17mm socket to remove lower strut bolts. We sprayed WD-40 around the strut bolts so that they would slide out easier. The lubricant is optional.
The nut towards the top of the strut is a tricky one. Grab your 17mm crescent wrench to hold the nut in place while you use a socket wrench with an Allen key to loosen the inner bolt. The link should slide out.
Unbolt the outer tier rod. First remove the holding pin. A 19mm is the used to remove bolt on steering knuckle. Grab the rotor at 3 and 9 o'clock and mimic left and right turns to loosen the outer tie rod bolt and then pull out.
We found it safer, easier, and faster to leave the top hat on the vehicle as we remove the strut and spring assembly. Place spring compressors snuggly on the spring as you prepare for the next step. From the engine bay. unbolt the top nut from the strut by using a 19mm socket then tilt the strut and springs assembly towards you. Be mindful of the fender while you pull it out. Remove the top hat from the vehicle by using a 14mm socket to remove the three nuts that hold it in place.
We used a compressor to compress the spring before reinstalling the top hat. If you do not have a compressor, manual spring compressors must be used. Since we did not remove the brakes from the lower control arm one must carefully clear the fender upon reinstallation so as to not scratch the vehicle itself when replacing the strut with the newly installed spring.
And that's it! Please consult with your Kia Stinger expert on torque specs on all stock nuts and bolts.
